Migrate Articles to Document Hubs
Alation Cloud Service Applies to Alation Cloud Service instances of Alation
Customer Managed Applies to customer-managed instances of Alation
Available from Alation version 2024.3.3
Overview
This topic explains how to migrate articles to Document Hubs. We are aiming to sunset articles in September 2025. Document Hubs are replacing articles as the primary way to manage long-form, written content in Alation. For more information on the switch to Document Hubs and the benefits of using them, see Documentation.
Role Requirements
You must have a Catalog Admin or Server Admin role to migrate articles to Document Hubs.
Access to the Original Articles
Migrated articles will become documents in the chosen document hub and will have a link back to the original article. The original article will be soft-deleted, making it unavailable in the left navigation pane and in search results. The original article will still exist in the database and can be accessed by visiting the old article URL. The old article will have a link to the new document in the document hub.
When articles are sunset (expected September 2025), the old articles will no longer be available.
Article Attachments
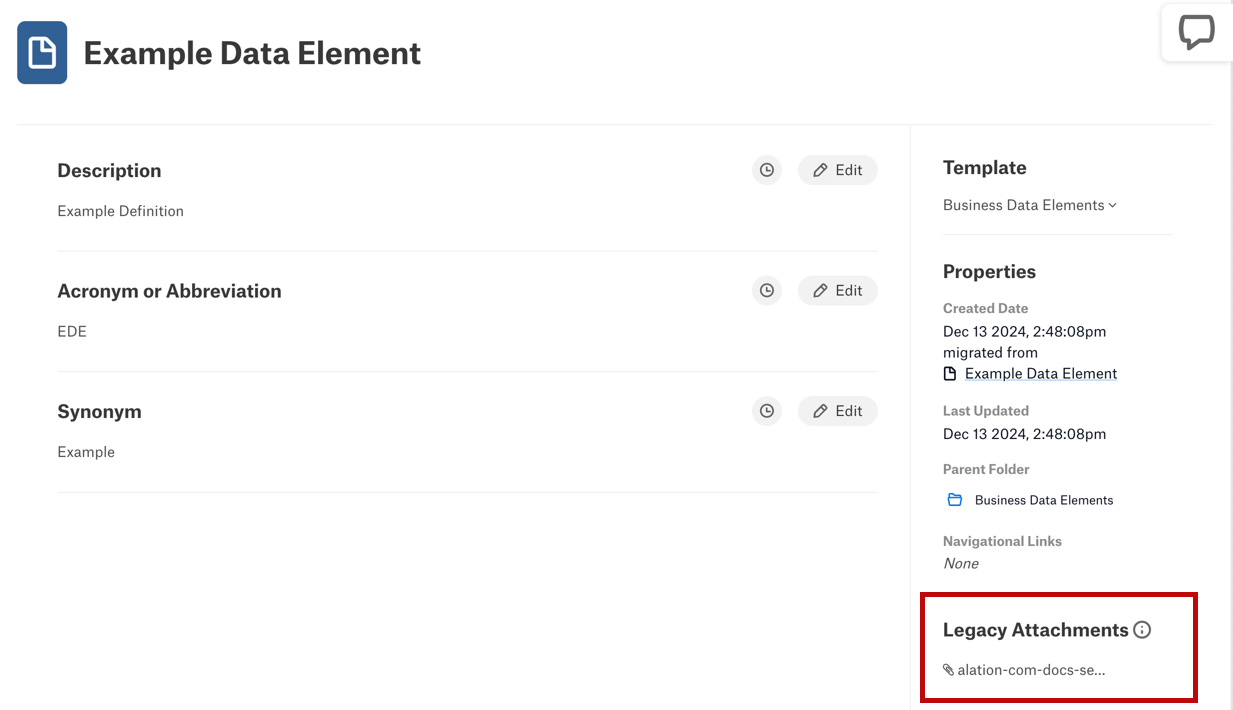
Article attachments are migrated along with the articles and appear in a Legacy Attachments field on the resulting document.

You can download and delete legacy attachments. Deleting a legacy attachment also deletes it from the soft-deleted copy of the original article.
You can’t upload new attachments to the document.
When articles are sunset (expected September 2025), legacy attachments will be removed from documents. For ongoing storage of attachments, we recommend you use a dedicated file storage solution and link to the files from your Alation documents.
Privacy Setting Migration
Privacy settings are migrated from the original article to the new document. See Document Hub Permissions for more information on privacy settings in Document Hubs.
Step 1: Enable Required Features
Before you can migrate articles to Document Hubs, you must enable Document Hubs and the article migration feature.
Plan How to Enable Document Hubs
If Document Hubs aren’t enabled yet, plan for how to enable them. Document Hubs are enabled in two stages:
First, Document Hubs are enabled for admin users only. This allows you to set up Document Hubs before making them visible to all users.
Second, Document Hubs are enabled for all users. At this point, all users can see and access Document Hubs.
You can migrate articles to Document Hubs during both stages:
If you migrate articles during the first stage—The articles that have been migrated to Document Hubs won’t be visible to all users until Document Hubs are fully enabled. When articles are migrated, they are soft-deleted, making them unavailable in the left navigation pane and in search results. The articles are still available in the database and can be accessed by entering the old article URL directly. Users who don’t know the article URL won’t be able to access the old articles, and they won’t be able to access the new documents until the document hub is published.
If you migrate articles during the second stage—Users may see an empty document hub until articles are migrated.
For more information on enabling Document Hubs, see Enable Document Hubs, Glossaries, and Terms.
Enable the Article Migration Feature
The article migration feature will be enabled automatically for Alation Cloud Service customers on the cloud-native architecture. To check if the feature has been enabled on your deployment, visit any article group or top-level taxonomy article. If a banner at the top of the page states that the article group or taxonomy is eligible for migration, the feature has been enabled.

If you’re using a customer-managed deployment on 2024.3.3 or later, you can enable the article migration feature by setting the alation_conf parameter alation.document_hubs.DEV_article_document_hubs_migration to True. On using alation_conf, see Use alation_conf.
Step 2: Get Articles Ready for Migration
To migrate any given article to Document Hubs, the article must:
Be part of a taxonomy or article group.
Be assigned to exactly one template.
These requirements are described in more detail below.
To help you organize your migration effort and identify articles that need attention, you can use the “Article Landscape” query on the Alation Community site (requires a login).
Assign Articles to a Taxonomy or Article Group
Articles are migrated in groups, either as part of a taxonomy (hierarchical structure) or article group (collection). If you need to migrate an article that doesn’t belong to a taxonomy or article group, you must assign it to one.
To decide whether to migrate articles as part of a taxonomy or article group, consider the following:
Each taxonomy or article group will be migrated into a folder of your choice in the chosen document hub.
To migrate an article taxonomy, you must choose the top-level article in the taxonomy. The migration process will migrate all articles in the taxonomy, including any sub-taxonomies and articles.
When you migrate a taxonomy, the resulting documents will have a hierarchical structure that mirrors the taxonomy structure, with parent documents and sub-documents. This is useful when you want to maintain the same structure in the document hub as in the original articles.
When you migrate an article group, the resulting documents will have a flat structure, with all articles at the same level in the destination folder.
Each article is migrated only once. If an article is part of both a taxonomy and an article group, you must choose one to migrate the article with. Once the article is migrated, it will be soft-deleted and unavailable in the other taxonomy or article group. Consider migrating taxonomies first if you need to preserve the article hierarchy.
Assign Articles to a Template
To identify articles that need template work, you can:
Use Alation’s built-in migration check during the migration process (described below).
Use the “Article Landscape” query on the Alation Community site (requires a login).
Either of the following situations will require you to take action before migrating articles:
If an article is not assigned to any templates—You must assign the article to a template. You can create a simple article template without custom fields to assign to articles that don’t have a template.
If an article is assigned to multiple templates—You must remove all but one template assignment. To keep all the relevant information from each template, you can create a new template that contains all the custom fields from each existing template.
You can use the Bulk Utility to assign templates to multiple articles at once.
Remove Unneeded Articles
Review your articles and delete any that are no longer needed so they don’t get in the way of your migration effort. The “Article Landscape” query on the Alation Community site can help you identify articles that are old or seldom used.
Step 3: Configure Destination Document Hub
Before you migrate any articles, you must create the document hub that will hold the migrated content. See Manage Document Hubs for best practices on designing document hubs. See Create a Document Hub for help creating a document hub.
About Draft Mode
When you create a new document hub, you can choose to keep it in draft mode so it won’t be visible to users until you’re ready to publish it.
If you migrate articles while the document hub is in draft mode—The articles that have been migrated won’t be visible to all users until the document hub is published. When articles are migrated, the articles are soft-deleted, making them unavailable in the left navigation pane and in search results. The articles are still available in the database and can be accessed by entering the old article URL directly. Users who don’t know the article URL won’t be able to access the old articles, and they won’t be able to access the new documents until the document hub is published.
Note
Documents and folders can’t be moved within the document hub while it’s in draft mode.
If you publish the document hub before migrating articles—Users may see an empty document hub until articles are migrated.
Prepare Folders
For article taxonomies—You must choose an existing folder in the document hub to migrate the articles to. See Create a Folder for help creating folders.
For article groups—You have two options:
Migrate the articles to an existing folder in the document hub. See Create a Folder for help creating folders.
Let the migration process automatically create a new folder. The new folder will use the title and description of the article group. Domains assigned to the article group will not be copied to the folder.
Prepare Templates
When you migrate articles to Document Hubs, you can choose to migrate the article templates as well.
If you choose to migrate the templates—The templates are copied to the document hub and the migrated articles are assigned to the copied templates. This is the easiest way to migrate articles, but it may require some work after the migration to adjust or fine tune the templates.
If you choose not to migrate the templates—You must choose one of the templates that’s available in the destination hub to assign to the migrated articles. This may require more work before the migration to ensure that the templates are ready for the articles. See Create a Document Template for help creating templates.
Prepare Your Users
Your users should be prepared to use Document Hubs and know how to access the migrated content. You may want to conduct user training or share Alation’s documentation on Document Hub Basics with your users.
Step 4: Migrate Articles
After you’ve prepared to migrate articles, you can start the migration process.
Navigate to the article group or top-level taxonomy article that you want to migrate. At the top of the page, a banner appears stating that the article group or taxonomy is eligible for migration. The banner is only visible to users with Catalog Admin or Server Admin roles.

Click the Begin migration readiness check button in the banner. The banner changes to state that the readiness check is in progress. Alation checks the articles in the group or taxonomy to ensure they each have exactly one template. You can expect the check to complete within a few minutes in most cases.

While the check is running, you can continue to work in Alation, or you can wait and refresh the page to see if the check is complete. When the check is complete, the banner changes to state that the check is complete and indicates whether the articles are ready for migration.
If the articles are ready:

If the articles have issues to address:

If the articles are ready, click the See results and configure migration button in the banner. You can skip the next step.
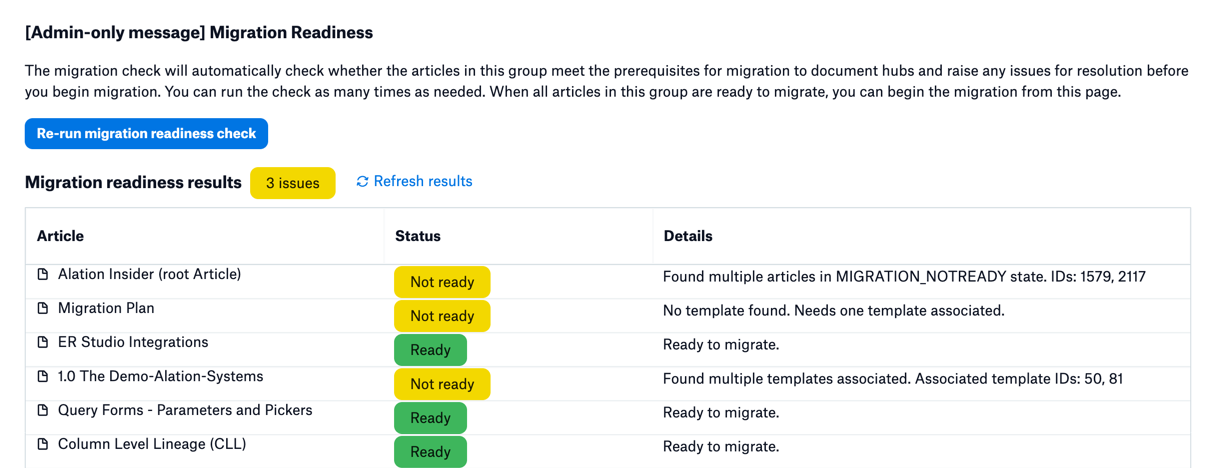
If the articles have issues to address, click the Review issues to resolve button in the banner. A special page opens showing the results of the migration readiness check. Here’s an example:

Each article is listed with an indication of whether it’s ready for migration. The root article is listed at the top along with a summary of all issues. All articles are listed below, indicating whether they’re ready or not. Scan the list to find articles that have issues. There are two possible issues:
No template found—The article is not assigned to any templates. You must assign the article to a template before you can migrate it. One way to solve this issue is to create a simple article template without any custom fields, then assign that template to the articles. You may want to use the Bulk Utility to assign templates to multiple articles at once.
Found multiple templates associated—The article is assigned to multiple templates. You must remove all but one template assignment before you can migrate the article. To keep all the relevant information from each template, you can create a new template that contains all the custom fields from each existing template.
When you’re done fixing the issues, click the Re-run migration readiness check button to recheck the articles. The root article’s Status column changes to Migration readiness check initiated to indicate that the check is in progress. Click Refresh results to check for the updated results.
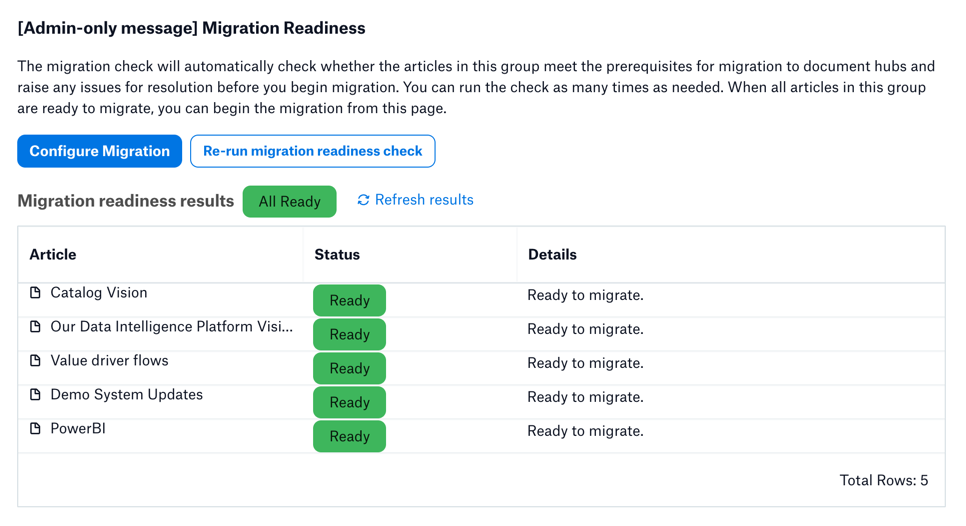
When all articles are ready for migration, the Migration readiness results shows All Ready in green and the Configure Migration button appears. Here’s an example:

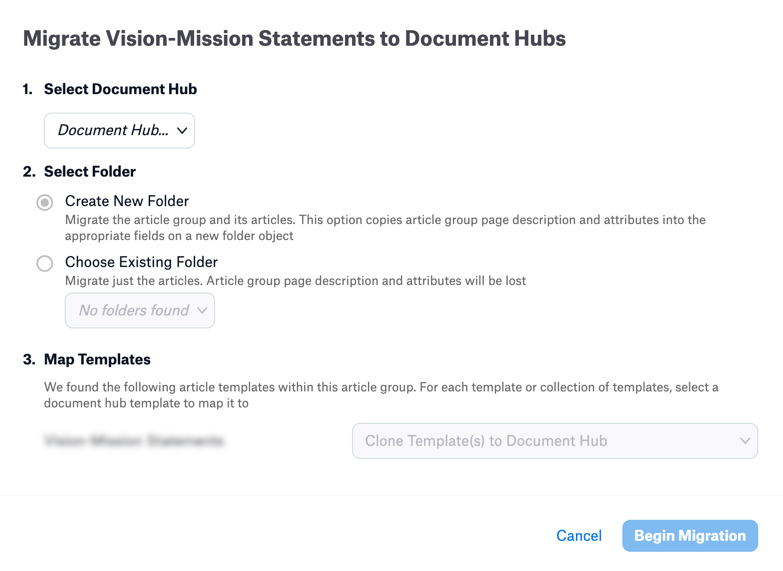
Click the Configure Migration button. A dialog appears where you can choose the hub, folder, and template to migrate the articles to.

Select the document hub you want to migrate the articles to. If you don’t have a document hub ready, click Cancel to close the dialog and create or configure a document hub. See Manage Document Hubs for help working with document hubs.
If you’re migrating an article group, choose whether to create a new folder or use an existing folder.
If you choose to create a new folder, the folder will be created automatically during the migration. The new folder will use the title and description of the article group. Domains assigned to the article group will not be copied to the folder.
To migrate the articles to an existing folder, you must have created the folder already. See Create a Folder for help creating folders.
Note
If you’re migrating an article taxonomy, you must choose an existing folder in the document hub to migrate the articles to. See Create a Folder for help creating folders.
At the bottom of the dialog, there’s a list of all the templates in use by the articles being migrated. Choose whether to migrate each template or replace the template with one from the document hub.
If you choose to migrate a template—The template will be copied to the document hub and the migrated articles will be assigned to the new templates. This is the default.
Note
If you’re migrating an article taxonomy, note that in the migrated documents, any sub-documents are displayed in a custom field called Documents. If this field is not part of the chosen template, sub-documents will not be visible in the new document. You can add the Documents field to the template after migration if needed.
If you choose not to migrate a template—Click the dropdown next to the template name and choose one of the templates that’s available in the destination hub to assign to the migrated articles.
Note
If you choose a template that doesn’t have all the fields that the original article template has, the field values will still be migrated to the new document, but the fields themselves will not be visible in the new template.
Click the Begin Migration button to start the migration process. You will be taken back to the original article or article group where you initiated the migration. You can expect the migration to complete within a few minutes in most cases. During the migration, the old articles and article groups may be briefly locked for editing. When the migration is complete, the old articles will display a banner indicating that they have been soft-deleted, and the new documents will be available in the document hub. You may need to refresh the page to see the changes.
Note
Soft-deleted articles and article groups are unavailable in the left navigation pane and in search results. They are still available in the database and can be accessed by entering the old article URL directly. They will display a banner indicating that they have been migrated to a document hub.

Step 5: Post-Migration Tasks
If your document hub is in draft mode, you must publish the document hub to make the migrated articles visible to users. Click the Publish button in the document hub to publish it. If the Document Hubs feature hasn’t been fully enabled, you must finish enabling it before users can see the migrated articles.
Article templates are fixed-order templates, whereas Document Hub templates are adjustable-order templates. See Template Types for more information. If you migrated any article templates, you may want to adjust the order of the fields in the new templates after migration. If you migrated an article taxonomy, you may want to add the Documents field to the template to display sub-documents.
If you are done migrating articles, you can disable articles to prevent articles from being created or accessed. On the Alation Feature Configuration page, enable the toggle Hide all entrypoints in the UI for Articles and Article Groups. Disabling articles will have the following effects:
In the Classic UI, the Articles section in the left side navigation pane will be hidden (articles are already hidden in the New User Experience).
Article Groups will be hidden in the Apps drawer.
Articles and article groups will not be available as filters when searching and will not be returned in search results.
The POST an article, UPDATE an article, and Resurrect an article endpoints of the Articles API will be disabled.
