Prerequisites
Alation Cloud Service Applies to Alation Cloud Service instances of Alation
Customer Managed Applies to customer-managed instances of Alation
Before you install the Azure Power BI Scanner OCF connector, ensure that you have performed the following:
Enable Network Connectivity
Open outbound TCP port 443 on the Azure Power BI server for the REST API communication.
Set Up the Azure Power BI Scanner
Setting up the Azure Power BI Scanner involves these steps:
Register an Application with Microsoft Entra ID
To register an application with Microsoft Entra ID, refer Register app with Microsoft Entra ID for more information.
Log in to the Azure portal as Cloud Application Administrator or Application Administrator. If the creation of registered applications is not enabled for the entire organization, any one of the roles is required.
Select Microsoft Entra ID.
Click App registrations (on the left pane) > New registration.
Specify a name for your client application in the Name field and then click Register.
From the Overview screen of the new app, copy the values for the following fields and store them in a secure location:
Application (client) ID
Directory (tenant) ID
Click Certificates & secrets from the left menu on the new app.
On the Certificates & secrets page, in Client secrets section, click + New client secret.
In the Add a client secret screen, specify the following information:
Description for your client secret.
Expiry
Click Add.
Copy the client secret and store it in a secure location.
Set API Permissions
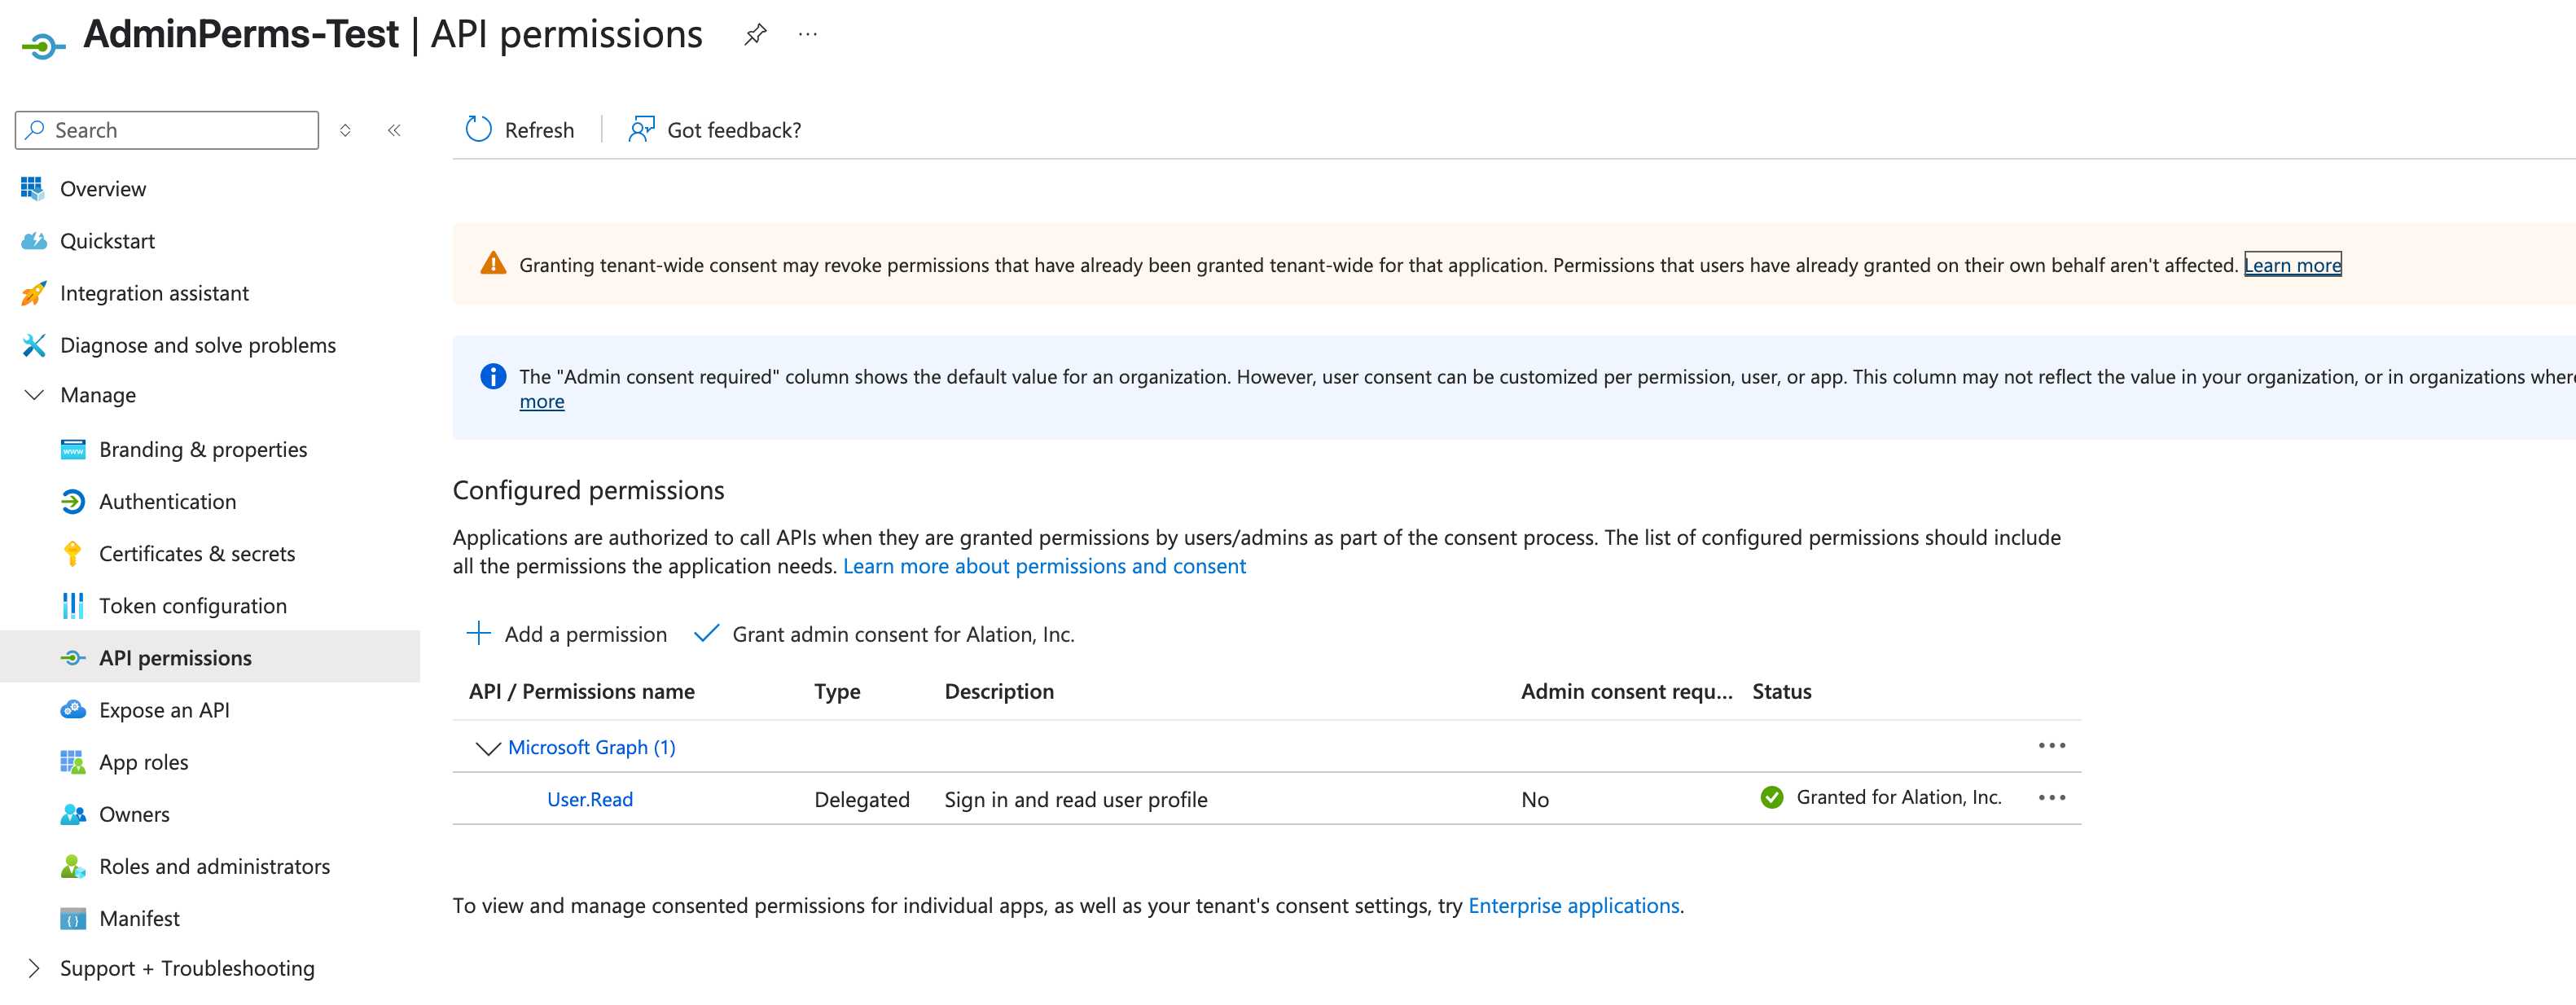
After you Register an Application with Microsoft Entra ID , we recommend that you retain the default values in the API permissions section, as shown below. The Azure Power BI Scanner OCF connector does not require any additional permissions to be set up in Azure.
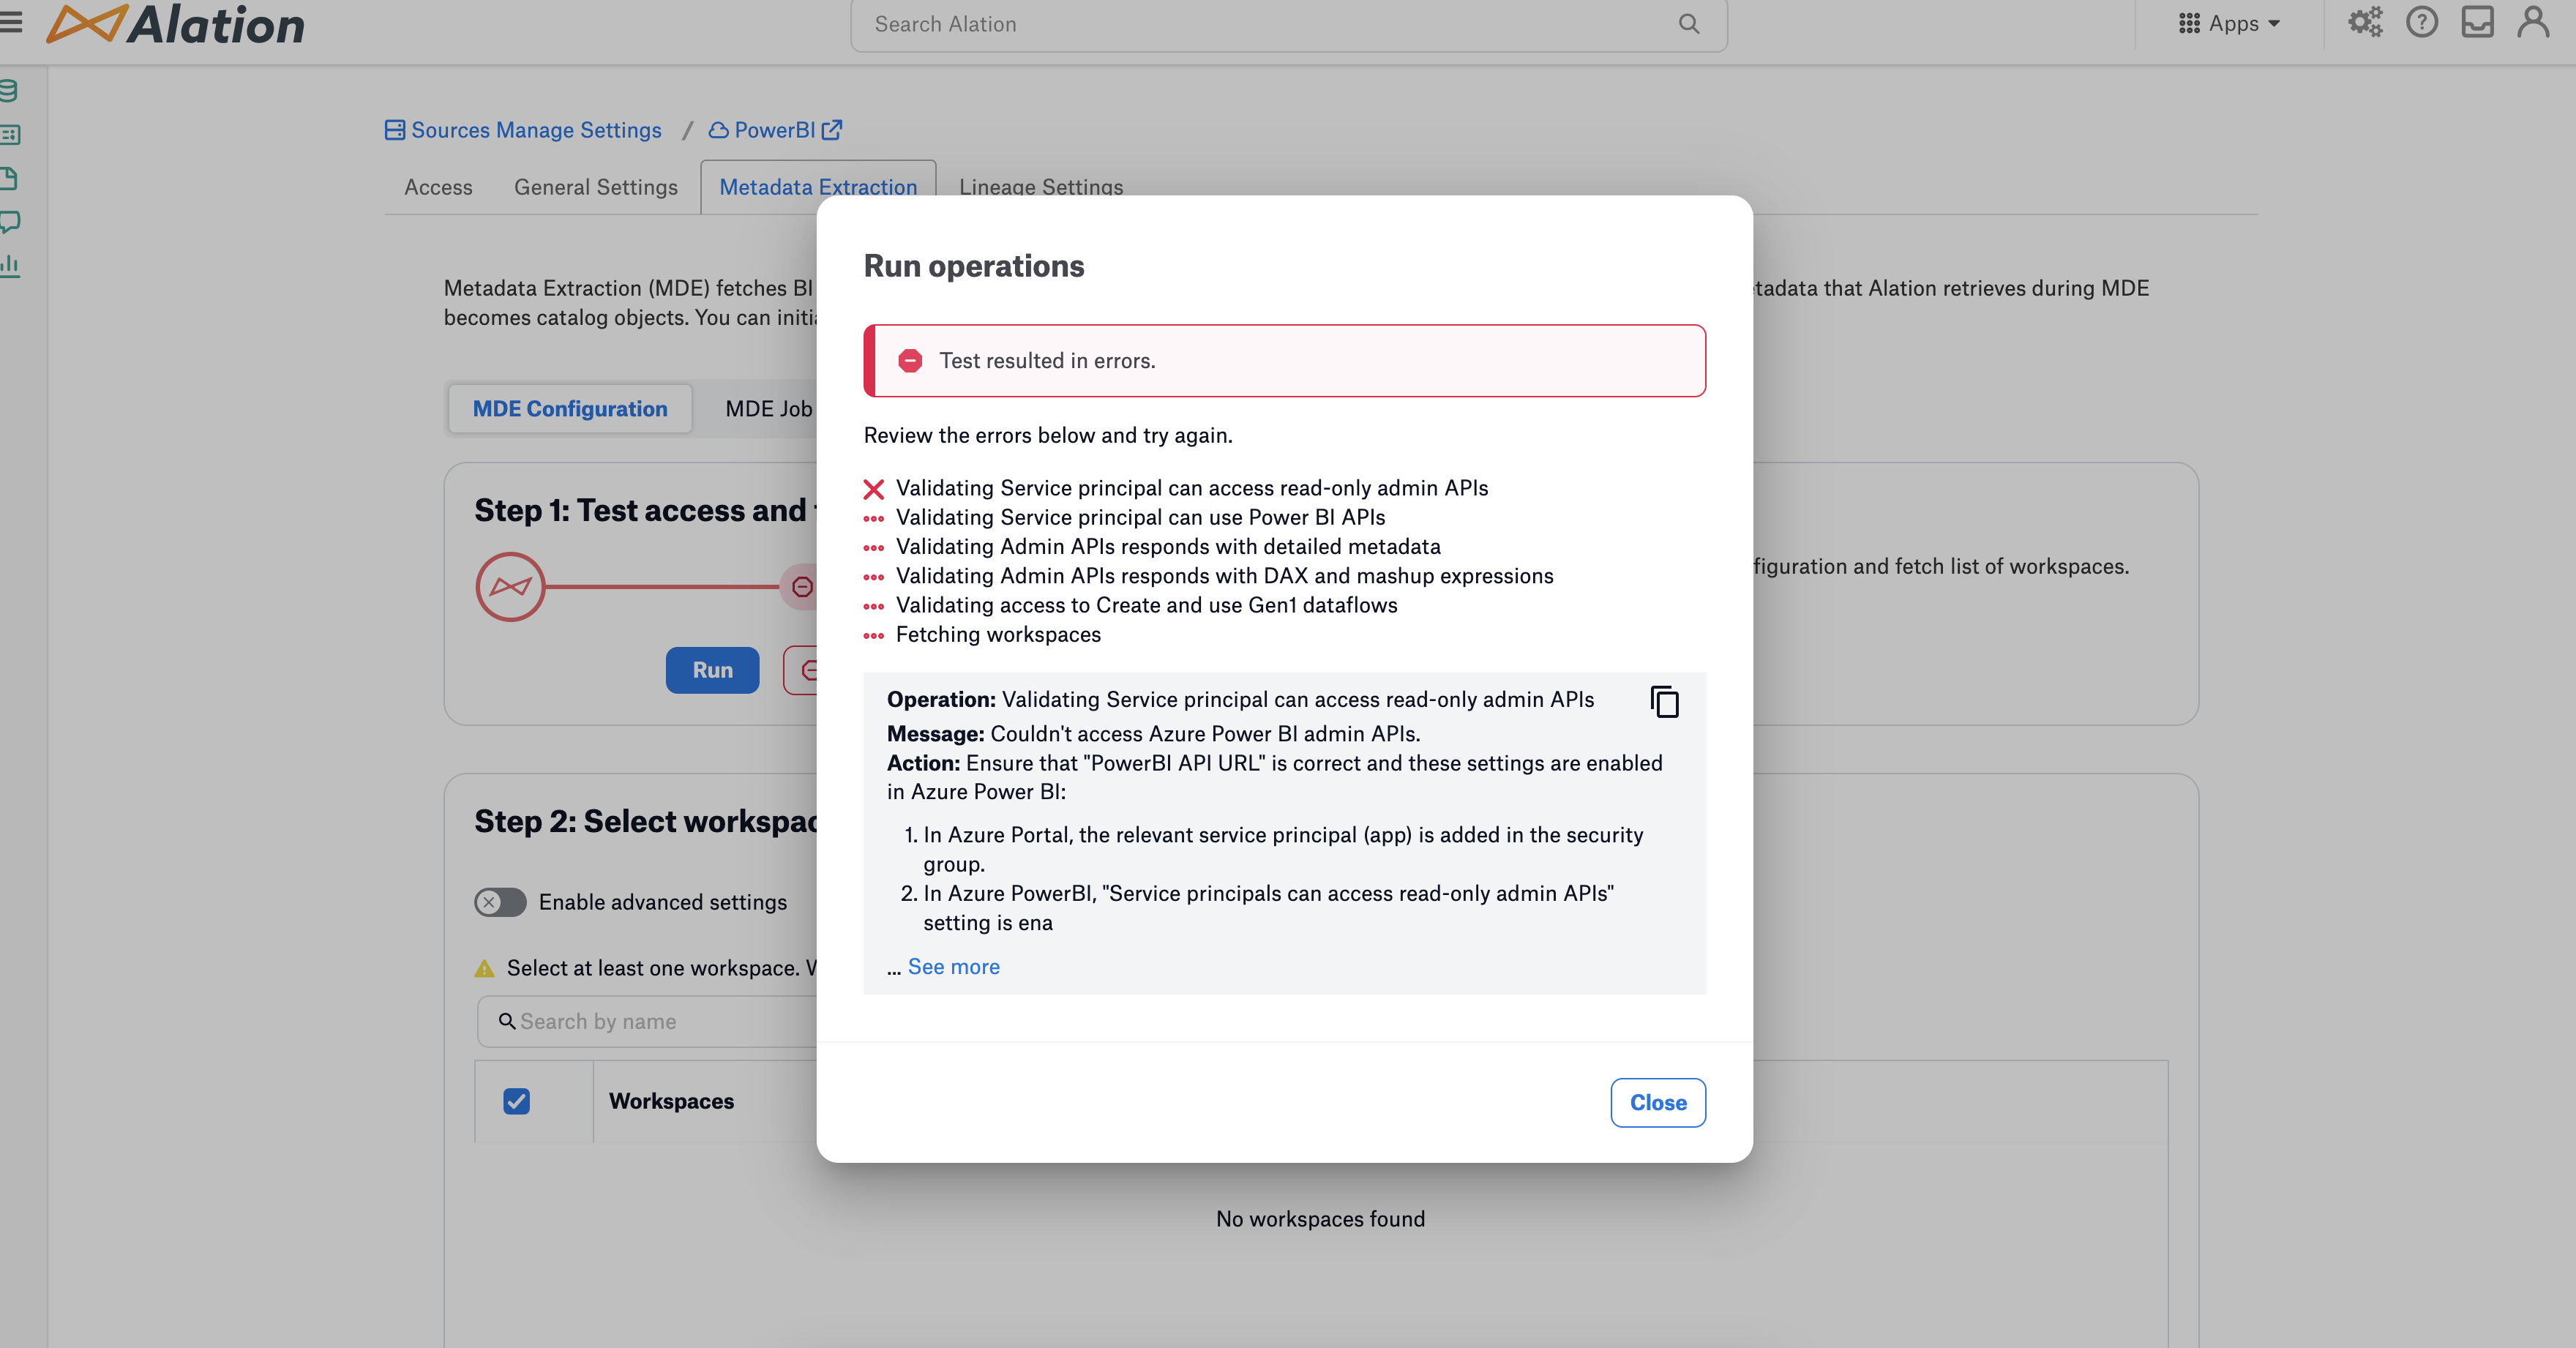
However, if you add additional admin permissions, such as Tenant.Read.All or Tenant.ReadWrite.All for Power BI Service, that require admin consent (Admin consent required), ensure you don’t change the default permission status, which is set to not granted (for example, Not granted for Alation, Inc). The admin permissions without admin consent result in the following behavior:
Preflight checks pass successfully.
When the Extract all the workspaces from Azure Power BI option in the Metadata Extraction tab of the Settings page is not selected, fetching workspaces will fail during preflight checks.
When the Extract all the workspaces from Azure Power BI option in the Metadata Extraction tab of the Settings page is selected, connector will fetch workspaces from Power BI. However, subsequent report column or pages and visuals extraction and dataflow API for dataflow info extraction will fail.


Granting admin consent (for example, Granted for Alation, Inc) to these admin permissions may result in the complete failure of preflight checks obstructing subsequent processes such as fetching workspaces and metadata extraction. Therefore, Alation recommends that you do not grant admin consent for these admin permissions.
Moreover, permissions granted in Azure may persist even after attempts to remove them later from the app registration. Create a new app registration and security group to resolve issues originating from incorrectly assigned permissions. Ensure that you don’t grant additional permissions in Azure during this new setup process.
Assign Workspace Permissions
Important
This step is not required if you perform the steps in Create a Security Group for Azure Power BI Scanner.
Grant the application you created in Step 1 member-level access to the workspaces you plan to catalog in Alation. Member-level permissions enable the connector to extract report dimensions and dataflows. For steps, refer to following Power BI documentation:
Important
The Power BI Admin must provide member-level access of service principal to at least one workspace.
To assign a Microsoft Power BI workspace role to the security group:
Open the Microsoft Power BI homepage.
From the left menu, click Workspaces and select your workspace.
click Access.
In the resulting panel, specify the email addresses and the name of the security group.
Depending on your workspace settings, set the following values:
For workspaces that do not have any parameters defined: Select Viewer from the dropdown.
If your workspace has any semantic models with parameters defined: Select Contributor from the dropdown to bring in the parameters to Alation. You must do this for all the existing workspaces for which parameters are defined.
To crawl and generate lineage for dataflows, in addition to crawling defined parameters for semantic models: Select Member from the dropdown.
Click Add.
Create a Security Group for Azure Power BI Scanner
Important
This step is not required if you perform the steps in Assign Workspace Permissions.
Log in to the Azure portal as Cloud Application Administrator or Application Administrator.
Select Microsoft Entra ID.
Go to Manage > Groups.
Click New group button.
Set the following values:
Set the Group type to Security.
Enter a Group name and a Group description (optional).
Select No members selected link in Members.
For Service Principal authentication, search the application. and click to select it.
Click Select.
Click Create.
Enable Azure Power BI Scanner Service Admin Settings
For an Azure application to be able to access the Power BI content and APIs, a Power BI admin needs to set Enable service principal access in the Power BI admin portal.
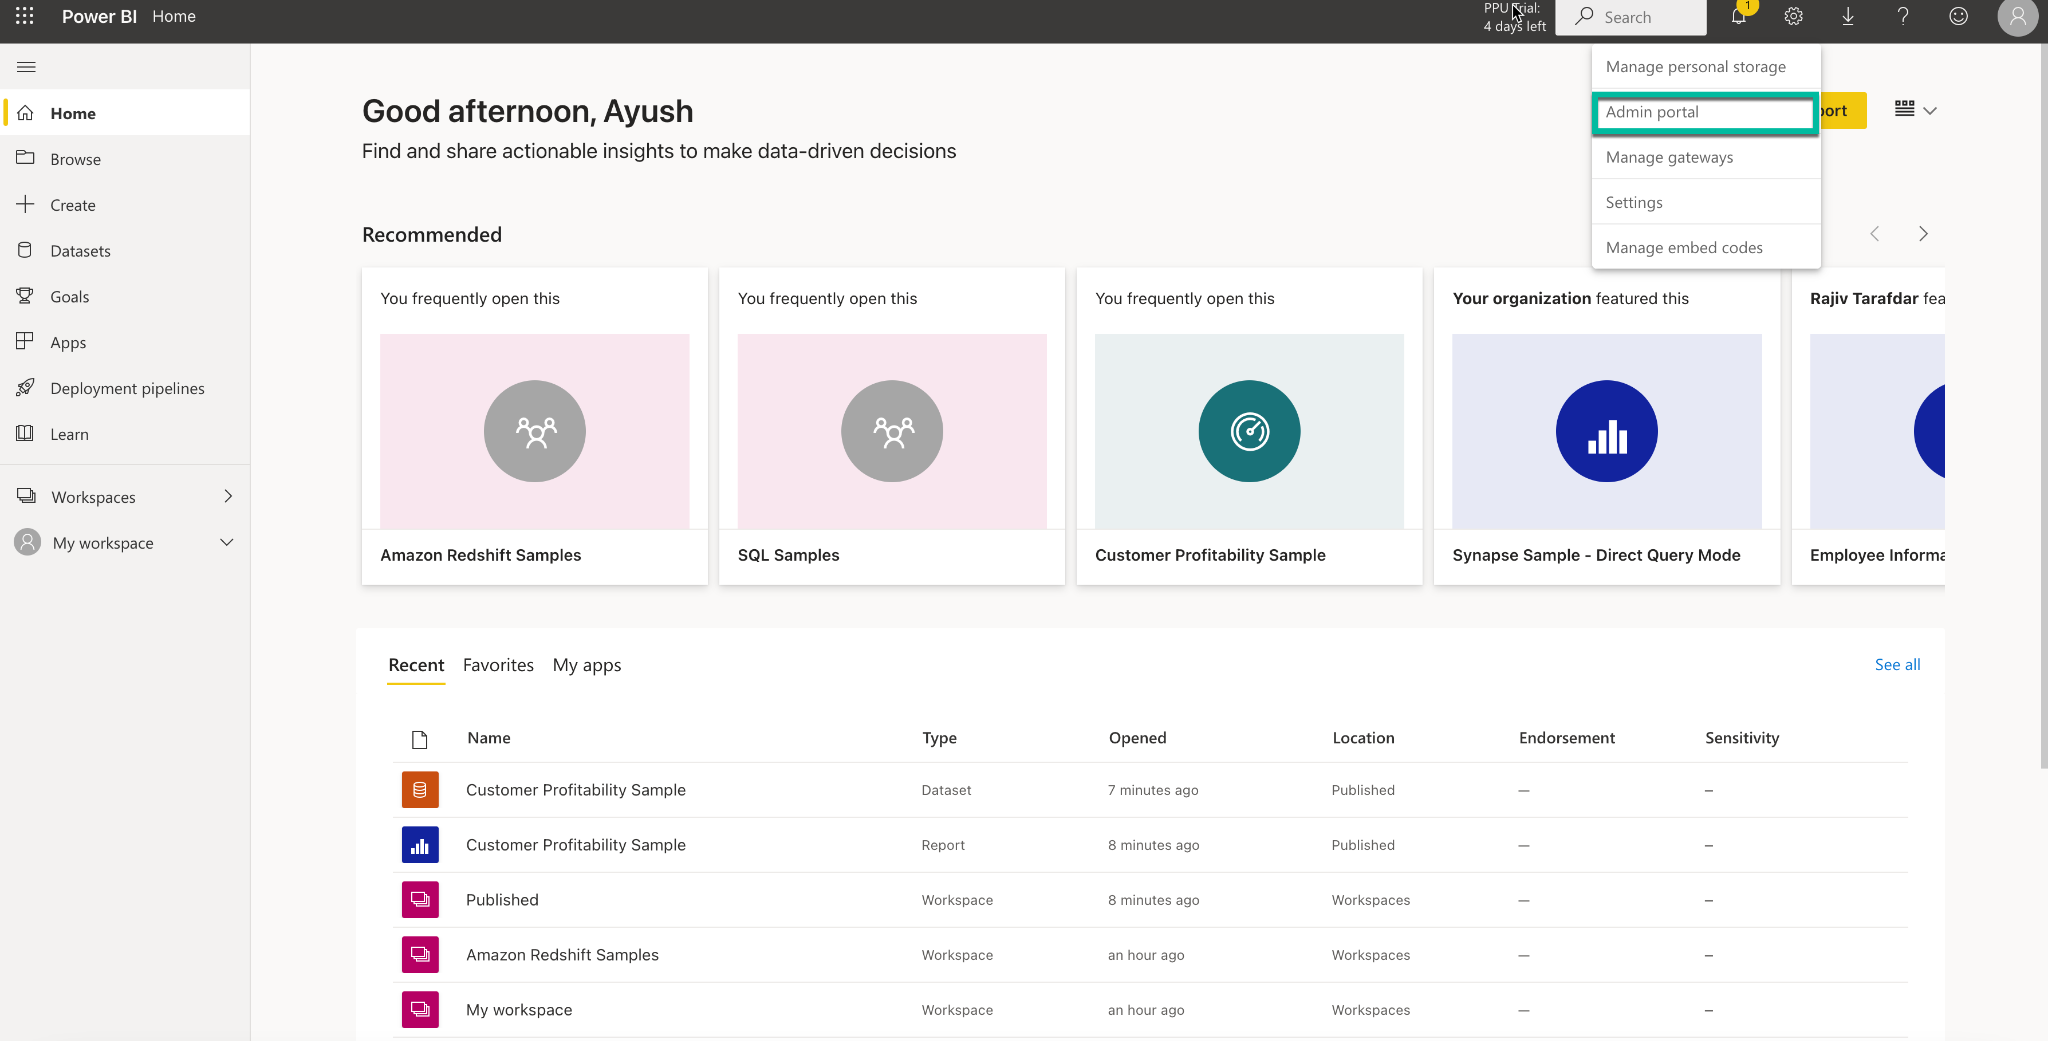
Login to Power BI.
From the Settings menu, select the Admin portal:
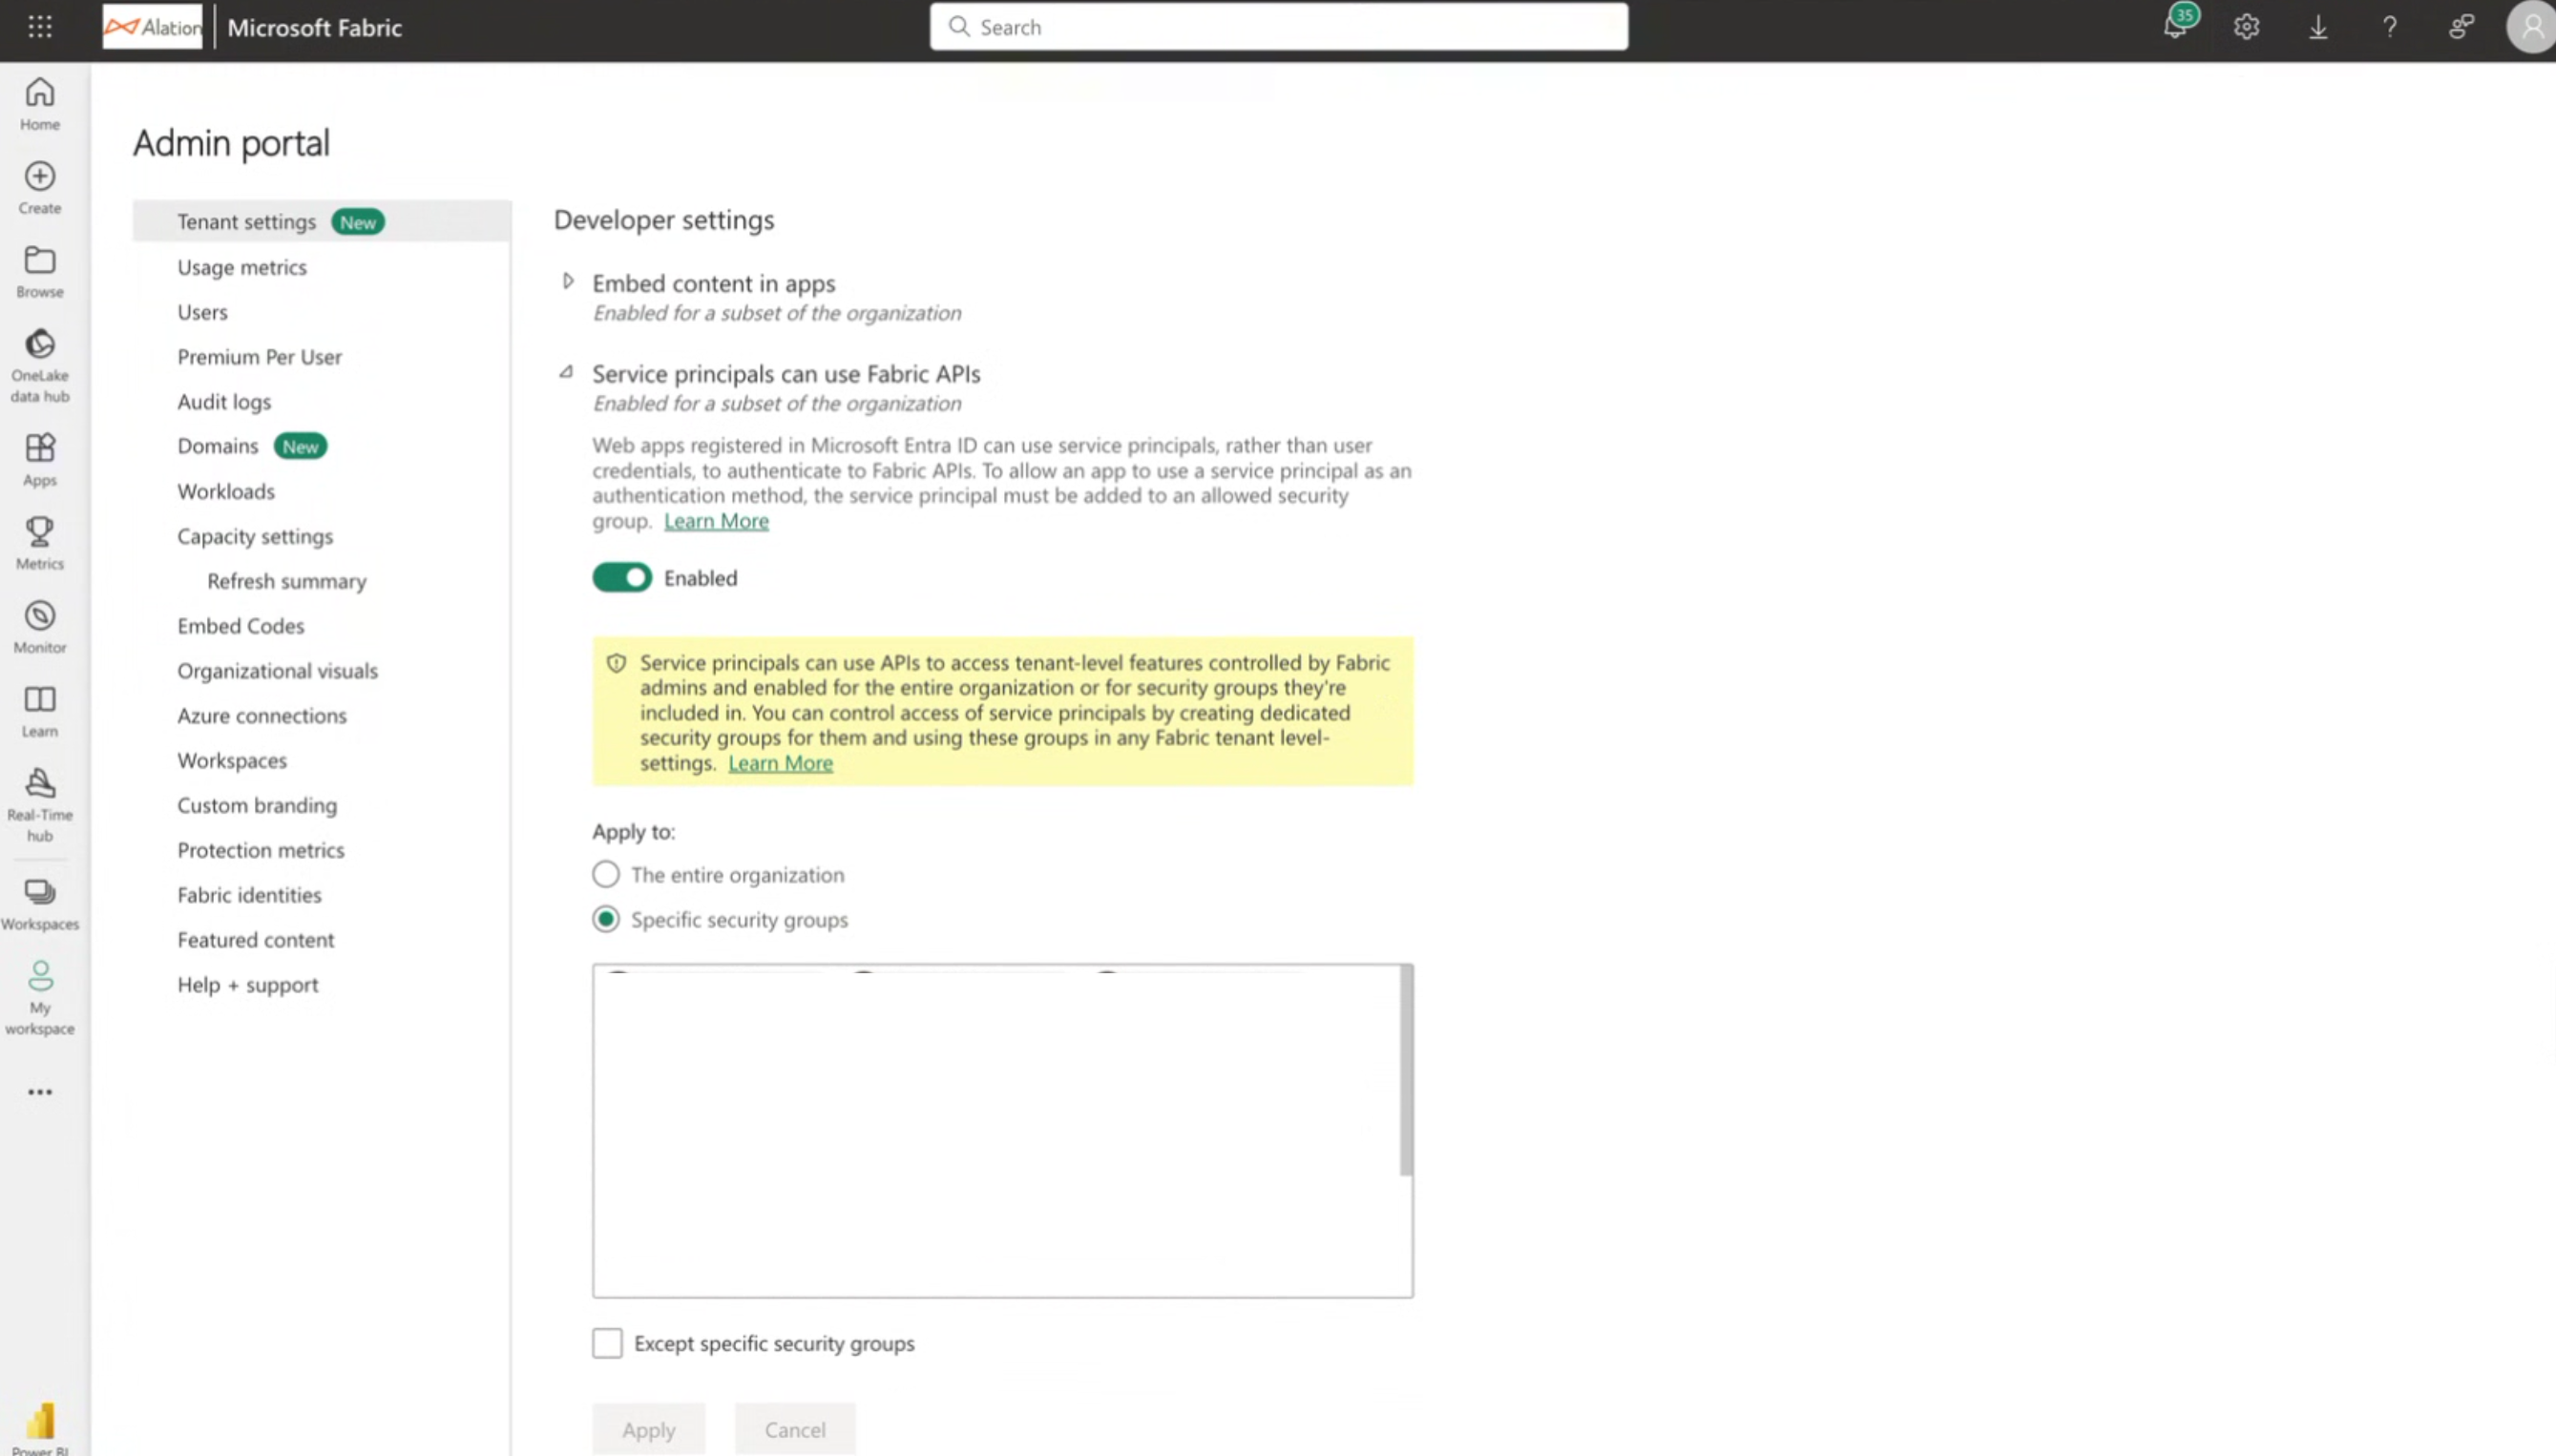
Navigate to Tenant Settings > Developer Settings and perform the following configuration:
3.1 Enable Service principals can use Fabric APIs.
3.2 Select the Specific security groups and select the security group created in Step 3.
3.3 Click Apply to apply the settings.
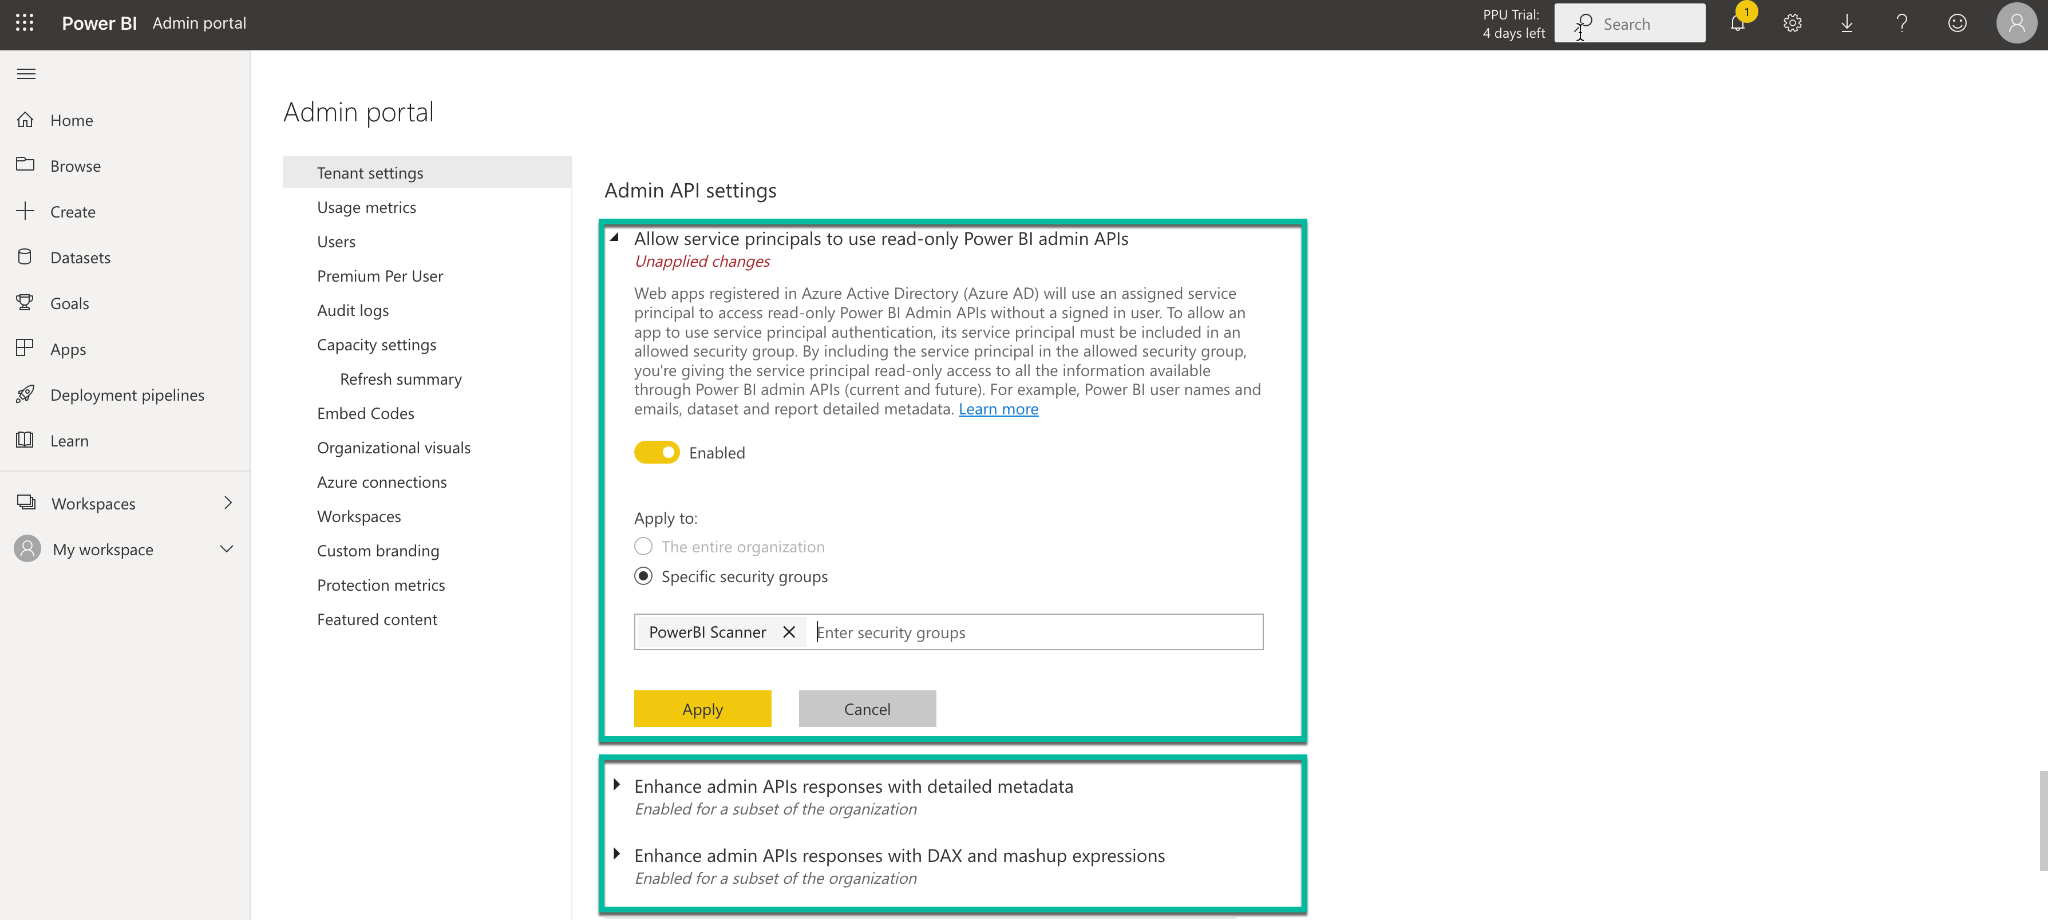
Navigate to Tenant Settings > Admin API Settings and perform the following configuration:
4.1 Enable Allow service principals to use read-only Power BI Admin APIs.
4.2 Select the Specific security groups and select the security group created in Step 3.
4.3 Click Apply to apply the settings.
4.4 Similarly, enable the following flags:
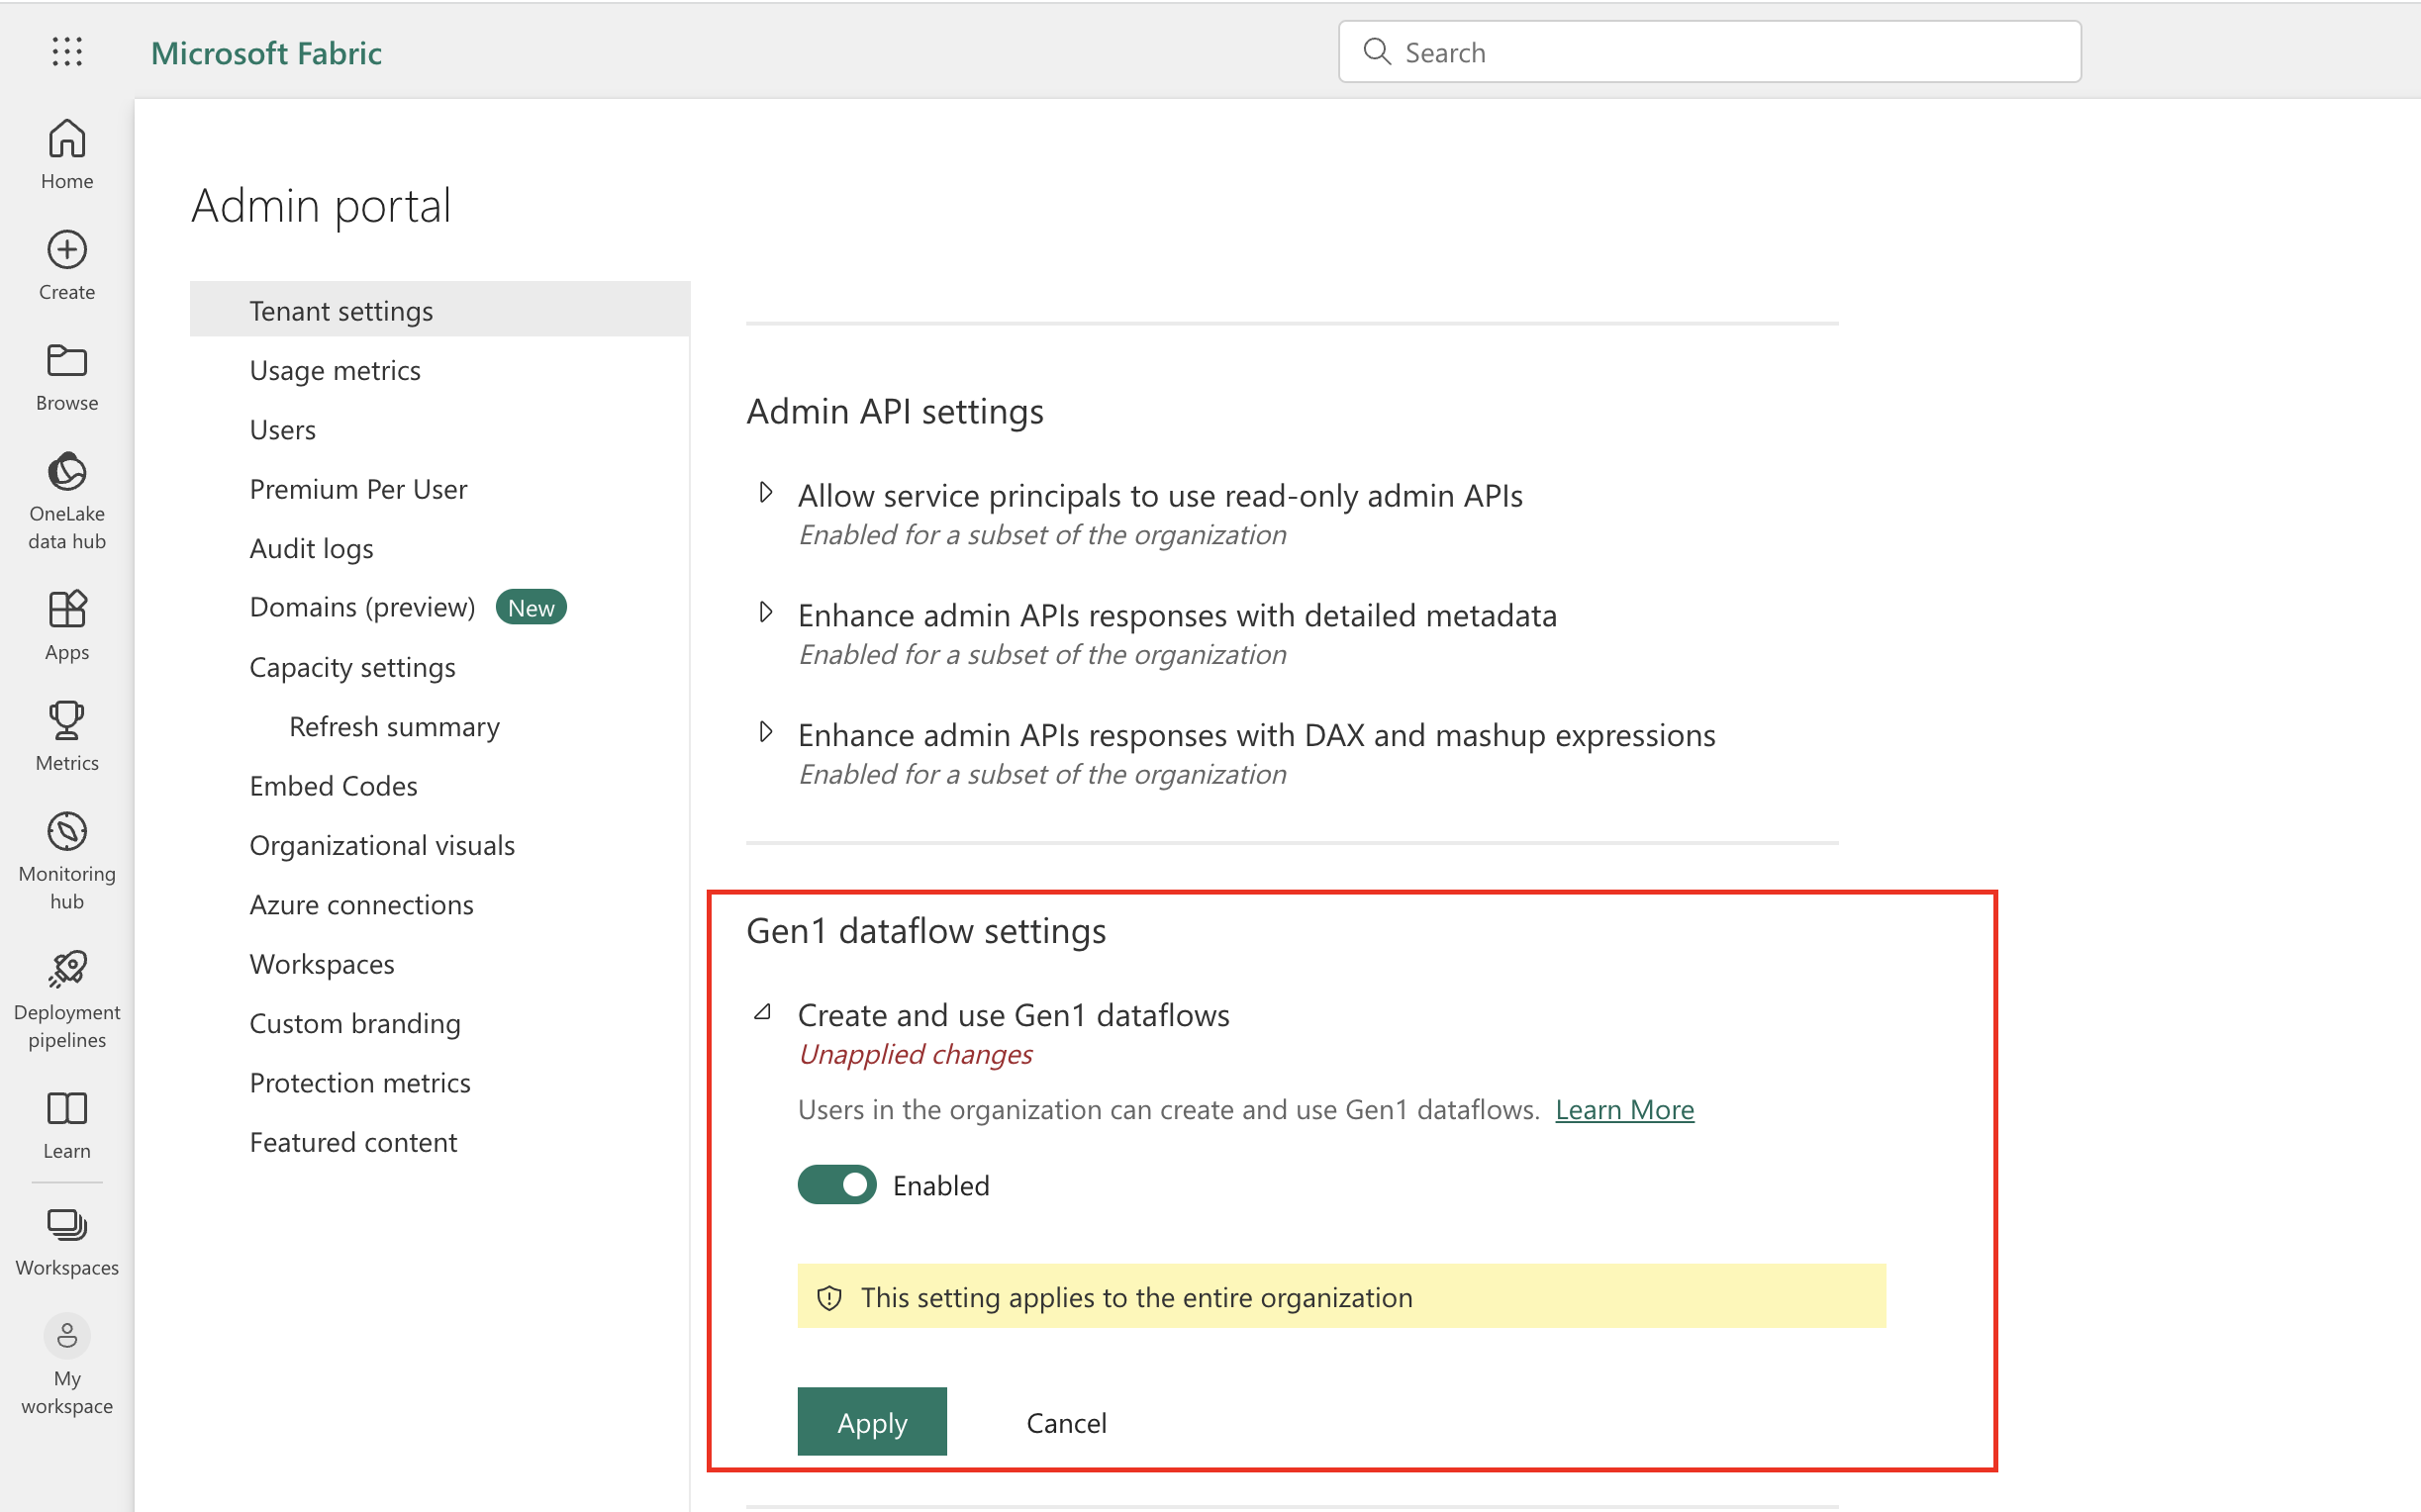
In Tenant Settings, navigate to Gen1 Dataflow Settings:
5.1 Enable Create and use Gen1 dataflows to extract the dataflow objects in Alation.
5.2 Click Apply to save the settings.
Note
The service principle requires member-level access to workspaces in Power BI to extract dataflows. The dataflow connection missing error may occur during extraction when workspace permissions are not available.
Under Tenant Settings, navigate to Download Reports:

